




Snow Plow Foot Adjustment: Setting Height for Clean Scrapes and Safe Surfaces
Snow plow foot adjustment by surface: how to set foot height for asphalt, gravel and ice, read pad wear, and stop gouges and left-behind snow.
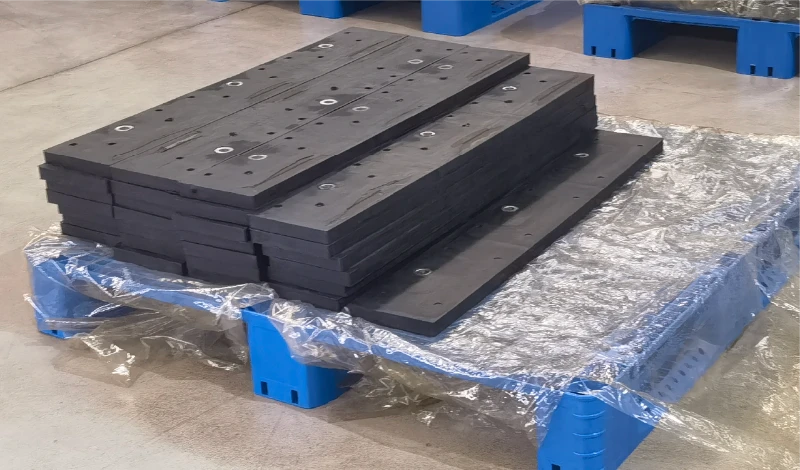
Two plows working the same street can leave completely different surfaces behind, and the difference is usually two adjusters nobody has touched since October. Snow plow foot height decides how deep the cutting edge works, which decides whether the pass scrapes clean or marks the pavement. This guide covers what the foot controls, how to set it for each surface, how to read pad wear, and how to re-tune the setting when the route or the machine changes.
What the snow plow foot controls
The plow foot sets working depth: the vertical distance the cutting edge is allowed to drop relative to the shoe contact plane. Everything else about the setting follows from that one relationship. A lower edge scrapes more snow and takes more impact. A higher edge protects the surface and leaves residue that traffic compacts. The adjuster exists so an operator can move between those two outcomes without changing blades or hardware.
Depth is also the input that the rest of the blade responds to. When the edge works lower, it carries more of the load, so the trip mechanism, the hangers and the moldboard see more shock. When the shoes carry the load instead, the cutting edge lasts longer but the surface stays partly covered. Neither setting is correct in the abstract, which is why adjustment is a per-route decision rather than a factory number.
The practical consequence is that the foot is a control, not a fitting. Machines set once and left alone are usually either hard on pavement or slow on ice, and the operator compensates with speed or extra de-icing material instead of with the adjuster.
What is the right plow foot height for each surface?
It is the setting that scrapes the surface clean without marking it.
Start with the edge just clear of the surface, then adjust until a test strip comes out clean. Gravel needs more clearance than asphalt, and hard-packed ice is the case where a lower edge earns its keep.
The same clearance produces different results on different surfaces. Asphalt with raised aggregate and open joints punishes a low edge, while smooth new asphalt tolerates one, and gravel does not tolerate a low edge at all because the blade cuts in rather than riding over it. Set by outcome on the worst stretch of the route: plow a short distance, stop, and look at what the edge left behind.
| Surface | Operator move | Symptom of a wrong setting |
|---|---|---|
| Asphalt, sound and smooth | Edge just clear; small increments when lowering | Gouge marks at joints, or a uniform film that refreezes |
| Asphalt, coarse or patched | More clearance; accept a thin film on the roughest sections | Stripped sealcoat, chipped patch edges |
| Concrete | Slightly more clearance than asphalt | Chips at expansion joints and slab edges |
| Gravel and unpaved | Highest practical setting; float rather than cut | Windrowed gravel, exposed sub-base, bent brackets |
| Hard-packed ice | Lower setting, with a carbide edge where available | Ice polished but not removed; refreeze overnight |
| Pavers and brick | Maximum clearance and light down-pressure | Loose units, displaced joint sand |
Once a setting is found for a route, write it down. A measured gap and the adjuster position are the two numbers that let another operator reproduce the result, and they are also the baseline for spotting drift later in the season.
Reading wear on foot pads
The pad records both the setting and the surface, and reading it takes less time than replacing it. Look at four things at every service: the wear face, the pad edge, the stem and the mount. A uniformly polished face is gliding, which is normal on pavement and a sign of over-lift on gravel. A cut or grooved face has been working against sharp aggregate, and a pad worn through to the fastener means the shoe, not the edge, has been doing the scraping.
Measure rather than estimate. Pad thickness at the unworn end gives the starting material and thickness at the wear face gives the current state; the difference over a known number of hours is a wear rate you can plan against. Recording it next to the adjuster position turns the next decision into arithmetic, and on a machine that runs two routes the comparison between them is the most useful number in the book.
Check the surrounding parts in the same pass. Corrosion on the stem, galled threads, a cracked bracket or an elongated hole all change the achievable setting, and none of them is visible from the cab.
How do you adjust snow plow feet?
Adjust in small increments, then test on the surface.
Loosen the locking nut, move the adjuster one step at a time, retighten, and test on the worst stretch of the route before repeating the process on the other side.
The sequence matters more than the tools, which are basic: the correct wrenches or sockets for the locking nut and stem, penetrating oil for a stiff thread, a tape or straightedge for the reference gap, and gloves. Park on level ground, lower the blade to a comfortable working height and support it so it cannot drop. Clean the thread before moving the adjuster, because grit in a thread turns a two-minute job into a stem replacement.
- Set a reference. Measure the current gap and write it down before changing anything.
- Free the adjuster. Loosen the locking nut and work the stem gently; if it will not move cleanly, stop and replace it.
- Move one step at a time. Small changes let you see the effect on the surface before you have gone past the useful setting.
- Retighten the locking nut. An unlocked adjuster will creep as the machine vibrates, which is a common cause of mid-season drift.
- Match the other side. Set both ends to the same measured gap so the blade stays level across its width.
- Test, then record. Run a short pass, look at the surface, and write down the final setting.
Adjustment is per-route work, which is how operator training programmes treat it; the resources distributed through the National Local Technical Assistance Program Association and state maintenance guidance such as MnDOT maintenance assume the setting is revisited rather than locked in, and commercial contractors work from the same principle through the guidance published by SIMA.
Re-tuning after switching routes
A machine that changes route mid-season should change setting with it. The move that matters most is between paved and unpaved work: the clearance that floats a blade over gravel leaves a film on asphalt, and the setting that scrapes asphalt cuts into a gravel lane. Moves between arterials and parking structures matter too, because ramps, expansion joints and drainage grates punish a low edge.
The workable approach is a setting card per route or per machine: the surface, the recorded gap, the pad type on the blade and the adjuster position. Handover notes do the rest. When a second operator takes the machine onto a different surface, the card turns a judgement call into a repeatable setup, and it gives the workshop a baseline when something starts wearing unusually.
Winter conditions also change within a route. A machine working wet, heavy snow is usually asked to clear to the surface, while the same machine on dry, cold snow may be run a little higher because residue will not compact into the same hazard. Recording the weather alongside the setting builds local knowledge, starting from the seasonal outlook published on the National Weather Service winter pages.
Why is my plow leaving snow behind?
The shoes are holding the edge too high for the surface.
Residue usually comes from too much clearance, pads that have worn and changed the effective setting, or a blade that has lost down-pressure at one end.
Work through the causes in order. First confirm the setting against your recorded number, because a locking nut that backed off or a pad that wore thin will both raise the edge without anyone touching the adjuster. Then check the blade across its width: if one end is higher, the pass will leave a stripe rather than a film. Check that the trip mechanism and the blade pitch are where they should be, since a blade that is no longer presenting its edge correctly will leave snow no matter where the shoes sit.
Residue is not only a quality complaint. Compaction turns a thin film into ice, and the usual response is more de-icing material, which has a cost further downstream: runoff from roads and other hard surfaces carries material into waterways, a pathway the Environmental Protection Agency describes in its stormwater material. Matching the setting to the conditions is part of the treatment decision rather than a detail after it. Surface and pavement condition data used to make that decision are summarised in the Federal Highway Administration road weather FAQ.
When uneven wear signals a setting that has drifted
Uneven pad wear is diagnostic evidence, and the first question is whether the setting moved or the machine did. Setting drift shows up as a difference between the two sides that was not there earlier in the season: one adjuster has crept because its locking nut worked loose, one stem is partially seized and no longer reaches the position it used to, or one side was adjusted and the other was not. All three are corrected with the adjuster and the recorded baseline.
Machine faults present differently. A bent hanger, a worn pivot pin or a cracked bracket loads one shoe harder regardless of the setting, and no amount of adjustment will level the blade. Those faults require repair, which is why the inspection described in SENTHAI’s guide on whether snow plow shoes are essential for winter road maintenance includes the mounting hardware rather than only the pad.
The practical test is a straightedge across the blade with both shoes set to the same measured gap. If the ends disagree, the problem is mechanical; if they agree but wear still differs, the route is loading one side harder and the setting should be checked more often.
A winter-to-winter maintenance routine
Most foot problems are created in the off-season, when a blade sits with a stiff adjuster, a corroded stem and a pad nobody measured. A short routine before, during and after the season costs less than one mid-storm failure.
- Pre-season: free every adjuster, inspect stems and brackets, replace pads at the wear limit and apply anti-seize to threads before assembly.
- Pre-season: record the reference gap for every machine and route so the first storm starts from a known setting.
- In-season: check the setting and pad thickness at each service interval, not on a calendar.
- After each route change: re-set and re-test, then update the setting card.
- Post-season: clean and lubricate the adjusters, measure remaining pad thickness and order replacements before the pre-season rush.
Spares planning belongs in the same routine. One spare pad set per blade prevents a mid-storm scramble, and fastener completeness matters because a shoe fitted without the right hardware rarely stays fitted. The shop-prep logic in SENTHAI’s guide to complete snow plow shoe replacement kits treats the fastener system as part of the replacement for that reason. Pooled research into plow blades and related winter equipment is collected by Clear Roads.
Quick settings reference table
Use this as a starting point for the setting card, then record what your own routes need. The middle column is the operator move; the third is what to check before trusting the setting on the next pass.
| Surface or condition | Adjuster move | Check before the next pass |
|---|---|---|
| Sound asphalt | Lower in small steps until the pass is clean | No gouge marks at joints or patches |
| Coarse or patched asphalt | Raise slightly; accept a thin film | Sealcoat and patch edges intact |
| Concrete with joints | Raise above the asphalt setting | No chips along slab edges |
| Gravel and unpaved | Raise to the highest practical setting | No windrowed gravel or exposed base |
| Hard-packed ice | Lower, accepting more edge load | Ice removed rather than polished |
| Pavers and brick | Raise to maximum protection | Units and joint sand undisturbed |
| New pads fitted | Re-set from the recorded gap | Both ends level; torque re-checked after the first shift |
The conclusion is short enough for a cab card. The foot sets working depth, depth should follow the surface, and the setting should be recorded rather than remembered. Operators who adjust in small steps, match both sides and write the number down get clean scrapes without damaging pavement, and they catch hardware problems while they are still a workshop job rather than a roadside one.
Operator judgement is the part that improves with practice, and it improves fastest when the machine is set up predictably. SENTHAI manufactures carbide snow plow blades and wear parts in Rayong, Thailand, with fitment confirmed against AASHTO and DIN bolt patterns where a standard applies and dimensional tolerance held to plus or minus 0.02 mm. Send the blade model, the route surfaces and the mount on your machine, and the wear-part side of the setup can be specified rather than guessed.
FAQ
How often should snow plow feet be adjusted?
Adjust at the start of the season, whenever the machine moves to a different route or surface, and after any pad replacement. Between those points, check the setting at each service interval rather than on a fixed calendar. Settings drift because locking hardware moves under vibration and because pads wear, so the useful trigger is contact with the machine, not time.
What should I do if the plow foot adjuster is seized?
Do not force it. A penetrating oil soak followed by gentle working can free light corrosion, but a thread that is damaged or galled will not adjust accurately even if it moves. Cut or replace the stem, then protect the new thread with a suitable anti-seize compound before assembly. A seized adjuster is a parts problem, not a technique problem.
Do plow feet need resetting when new pads are installed?
Yes. A new pad brings the contact face back to full thickness, so the edge sits higher than it did with the worn pad at the same adjuster position. Set both sides to the recorded gap as a starting point, then re-test on the surface. Treating the old adjuster position as correct is the most common reason a machine suddenly leaves more snow after a repair.
Do plow feet wear out completely, or only the pads?
The pad is the designed wear item, but the surrounding parts wear too. Stems corrode and their threads gall, brackets crack or elongate at the holes, and pins and springs lose tension. Inspect the whole assembly when the pads come off, because a sound pad on a cracked bracket still puts the edge at the wrong depth and still loads the blade unevenly.
Send SENTHAI the blade model, the surfaces on your route and a photo of your current foot or shoe mount for a fitment check and a quotation on replacement wear parts. Write to [email protected] or use the contact form, and the setting that suits your route can be matched to the right pad material.
Related articles
 Best Snow Plow Blade Family for Your Fleet: Top 5 ScenariosKnowledge
 Top 10 Snow Plow Blade Types for Winter Fleets (Ranked by Duty Fit)Knowledge
 Top 5 Best Carbide Blade Configurations for Highway PlowingKnowledge
 Best Snow Plow Blade Materials Ranked: Steel vs Carbide vs Cladding vs Rubber-CarbideKnowledge