




Carbide Edge Inspection: Setting Intervals That Catch Wear in Time
Carbide edge inspection intervals explained: what each check should establish, how conditions shorten the cycle and how to make records comparable.
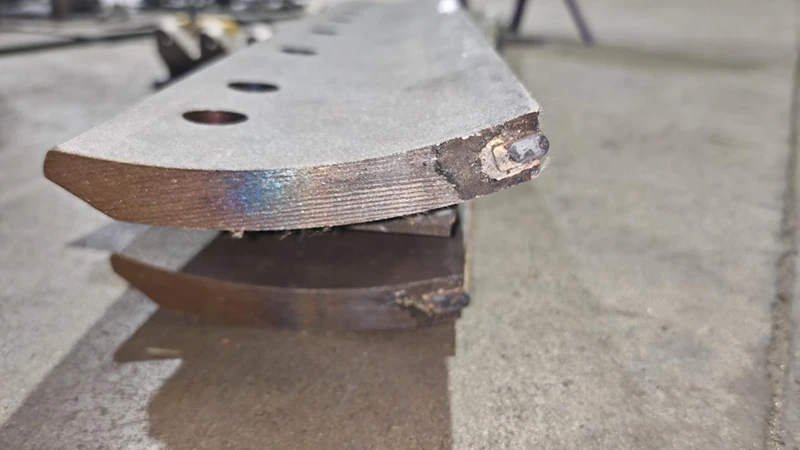
An inspection interval is a commitment about how much warning a fleet wants. Set it too long and wear is discovered when the edge has already stopped clearing, usually in the busiest week of the season; set it too short and the routine consumes hours that the workshop does not have, which is how inspection schedules quietly stop being followed. The useful interval is the one the fleet will actually complete, adjusted for the conditions each group of trucks works in.
What Carbide Edge Inspection Has to Establish
Inspection establishes remaining material and joint condition.
Each check should answer two questions: how much working material is left at fixed points across the edge, and whether the joint holding the carbide to the blade body is still sound. Everything else the inspection records supports those two answers.
Keeping the purpose narrow is what makes the routine repeatable. A check that tries to assess edge wear, hardware condition, moldboard state and operator impressions at every interval becomes long enough that it is deferred. Splitting the work is more effective: a short wear and joint check at each interval, and a fuller condition check at scheduled points in the season.
The evidence base for the routine comes from the edge itself. Where an edge retires evenly, the interval can be set from measured material loss. Where it retires through joint damage or chipping, the interval needs to be short enough to catch movement before an insert is lost, because that failure gives less visible warning. SENTHAI inspects and archives every batch and works to plus or minus 0.02 mm dimensional tolerances on carbide components, so a measured edge can be compared against the drawing it was produced to, and grade properties can be checked against methods published by ASTM.
Inspection Points and What Each One Tells You on a Carbide Edge
Each point on the edge answers a different question. Material height at fixed positions across the working width shows how much reserve is left and whether loss is even. The leading face shows whether the edge is wearing into a shape that will change contact behaviour. The bond line along the insert bases shows whether movement is developing. The mounting face and fasteners show whether the edge is still seated and preloaded.
Reading them together is what turns observations into a diagnosis. Even loss with sound joints and stable fasteners is normal wear and calls for a replacement decision on the measured interval. Even loss with fasteners that have lost torque suggests the mounting face needs attention. Localised loss with sound joints points to contact or alignment. Joint movement with little wear points to the production record rather than to the specification. Where a pattern question arises, the reference standards published by AASHTO and by DIN define the bolt patterns an edge was produced to fit.
The order of the check matters for practical reasons: inspect joints and fasteners before measuring wear, because an edge with a retention problem will be replaced regardless of how much material remains. Doing it in that order stops the workshop from spending time on measurements for an edge that is already due to come off. Training mechanics to perform the routine consistently is itself a skill, covered in the material on carbide blade inspection training.
Setting Intervals Around the Season Rather Than the Calendar
Intervals should follow events rather than dates. A practical structure starts with a check before the season, a check after the first sustained period of work, then checks at intervals derived from the measured wear rate, and a season-end check that closes the record. Where the measurements show that an edge consumes a particular proportion of its reserve per week of service, the interval can be set from that figure rather than estimated.
The pre-season check is the one fleets most often skip. It establishes a baseline for every edge in the fleet, identifies any that should be retired before the season rather than during it, and confirms that the mounting faces and hardware are in a condition to accept a new edge. That single check is what makes the later readings comparable, because it fixes the reference points and the starting measurement.
The closing check is the one that pays for the programme. It records total wear against route class, which is the input for the following season’s specification and inventory decisions. Without it, the fleet has a series of mid-season observations and no basis for changing anything deliberately.
Conditions That Shorten the Interval Between Checks
Three conditions justify a shorter interval. Abrasive, wind-packed snow on unsealed surfaces consumes material faster than loose snow on pavement. Routes with embedded debris transfer shock into the edge and the joint, and the failure that results is less visible than gradual wear. Refrozen, hard-packed surfaces reduce contact and push operators toward compensating down-pressure and repeated passes, which loads the edge and the mountings together.
Where a group of trucks works all three conditions, the interval should be set by the harshest rather than averaged. Averaging across conditions is how a fleet ends up inspecting comfortable routes too often and hard routes too rarely, with the result that the failures happen on the routes that were assumed to be manageable. Maintenance practice on ice-affected networks is a recurring subject in the pooled research published by Clear Roads.
Seasonal treatment adds another variable. Where abrasives are spread, the material itself contributes to wear; where liquid de-icing is used, the surface state changes and with it the load on the edge. Recording what was applied alongside the wear reading is what allows the fleet to explain a difference between two otherwise similar routes.
Tools, Records and Safe Handling During Carbide Edge Inspection
The tool kit should be small enough to keep at the point of work: a straight edge or gauge for height measurement, a light for inspecting the bond line and mounting face, a torque wrench, and hand protection for load testing inserts. Where a torque wrench is used regularly, it should be checked periodically, since an out-of-calibration instrument produces records that look precise and are wrong.
Records should be structured so that a later reader can compare without interpretation. One row per edge per check, containing the date, the truck, the route class, the measured heights at fixed points, the condition of the bond line and mounting hardware, and any action taken. Photographs from the same position at each check add information the numbers cannot carry.
Handling remains the main physical risk. Edges are heavy and awkward, and inspections often happen under time pressure at the end of a shift. Load handling assessment principles are published by the UK Health and Safety Executive, and general workshop requirements for hand and power tool use are set out in the OSHA occupational safety and health standards.
Acting on What the Inspection Finds
The value of inspection is entirely in the action it triggers, and the thresholds should be written before the season. Define the remaining height at which an edge is rotated and the height at which it is retired, then apply the same values to every truck in a group. Where an edge shows joint movement, the response is a retention decision rather than a wear decision, and the batch record behind the edge becomes relevant. Background on when inserts reach the end of their service is covered in the material on carbide insert wear.
Where a check produces an unexpected result, the record should say so rather than being adjusted to match expectations. An edge that wears faster than the group average is information: it may indicate a different route, a mounting problem or a specification mismatch. Recording the anomaly and reviewing it at the season end is how specification decisions get better; recording it as normal is how they stay the same for years.
Thresholds should also be applied by group rather than individually. Where one truck in a group is consistently the first to reach the rotation threshold, that truck is worth investigating on its own: a distorted mounting face, a different route assignment or a particular operator technique will explain it, and each of those is cheaper to correct than replacing edges early across the group. Where the whole group reaches the threshold at the same point, the interval itself is working and the specification can be judged on its own merits.
Building Inspection Into the Season Plan
Inspection competes with every other task in a busy week, so it survives only if it is planned. Put the checks into the season calendar before the season starts, attach them to events that already happen, such as a rotation or a service interval, and name the person responsible for each group of trucks. Inspection attached to an existing task is completed; inspection that requires a separate trip to the yard is deferred.
Review the interval once a season against the recorded wear rates. Where an edge consistently reaches the threshold well before its scheduled check, the interval is too long for that group. Where checks consistently find comfortable margins, the interval can be extended, freeing workshop time for the groups that need it. The interval should be a decision supported by records rather than a habit.
Carbide edge inspection is worth doing when it answers two questions quickly: how much working material remains, and whether the joint and mounting are still sound. Intervals should follow events and conditions rather than dates, and they should be short enough to catch joint failure before it becomes insert loss.
Fix the reference points before the season, record each check in a form a later reader can compare, and write the thresholds in advance. Reviewed once a season against the records, the interval becomes a managed decision instead of a recurring surprise.
Send SENTHAI your route groups, current inspection routine and a season of wear records, and the technical team will review the interval, the inspection points and the thresholds for each group.
Frequently Asked Questions
How often should carbide edges be inspected during a season?
Set the interval from recorded wear rather than from a standard figure: check before the season, after the first sustained period of work, then at intervals derived from how quickly the group consumes material, with a season-end check. Where a group works abrasive, debris-heavy or refrozen routes, shorten the interval, because joint failure gives less visible warning than gradual wear.
What should be checked first on a carbide edge?
Check joint condition and fastener preload before measuring wear. An edge with movement at the bond line or fasteners that have lost torque will be dealt with regardless of how much material remains, so measuring first spends time on an edge that is already due to come off. Material height is then measured at the same fixed points each time.
Why do inspection readings need to come from fixed points?
Fixed points make readings comparable between checks and between trucks. Measuring at the deepest point of wear shows how bad an edge is but not how fast it got there, which is the information a rotation or replacement decision needs. Consistent points also allow a group average to be calculated, which is what supports an interval review.
What is the right interval for a mixed fleet?
More than one. Groups working different surfaces consume edges at different rates, so a single fleet interval will be too long for some and unnecessarily short for others. Set the interval by group, based on the group’s own recorded wear rate, and review it at the end of the season so that the schedule follows the work rather than the fleet count.
Related articles
 Carbide Edge Failure Analysis: Reading the EvidenceCarbide snow plow blades
 Carbide Edge Tender: Writing Specifications That HoldCarbide snow plow blades
 Carbide Edge Installation: Torque, Sequence and SeatingCarbide snow plow blades
 Carbide Blade Fitment: Matching Patterns Across Common Plow MakesCarbide snow plow blades