




Plowshoe Replacement Guide: Sizes, Bolt Patterns, and Wear Limits
A plowshoe replacement guide for fleet workshops: how shoe sizes and bolt patterns are measured, the swap procedure, and the wear limits that end a shoe.
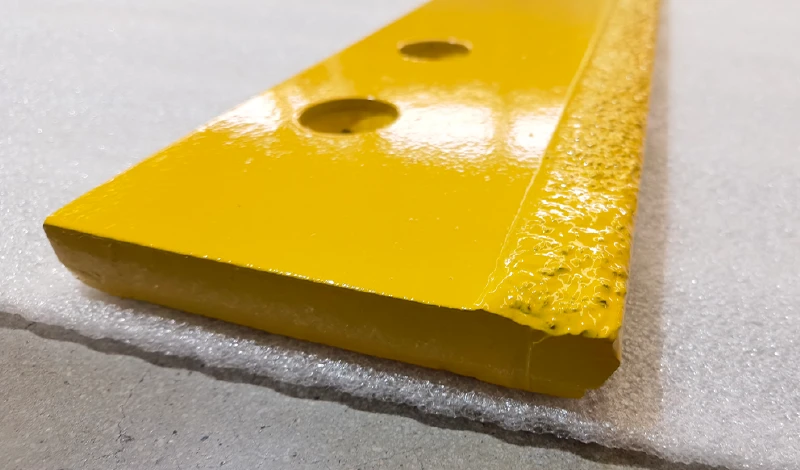
The left plowshoe is worn through to the bolt and there are four storms in the two-week forecast. That is the moment most fleets discover that a plowshoe is not a universal part: the replacement has to match the mount, the hole spacing and the stem height of one specific blade, and a supplier who is given only the word plowshoe cannot check any of those. This guide covers what the part does, how its size is actually defined, how to measure the shoe you have, and the wear limits that tell you a shoe is finished rather than worn.
What a plowshoe does and why it wears
A plowshoe is a consumable that carries load, and the load path explains both its failures and its price. The shoe sits below the cutting edge, takes a share of the blade’s weight and down-pressure, and holds the edge at a working depth. Every metre travelled, the pad slides over grit, salt, sand, ice and pavement. Sliding abrasion under load removes material, and the rate depends on the abrasive, the pressure and the sliding speed rather than on the shoe alone.
Four conditions shorten shoe life faster than distance alone. Grit-heavy surfaces cut rather than polish, so material disappears quickly. Excess down-pressure raises the load the pad carries at the same sliding speed. A setting that lets the edge ride below the shoe turns the shoe into a scraping surface. Loose hardware lets the shoe move under load, which wears the fasteners and eventually drops the shoe. Comparing pad materials by hardness alone is unreliable for the same reason: standardised abrasion tests such as ASTM G65 exist because wear is a system result, not a single property.
How plowshoe sizes are defined
There is no universal size chart, because a plowshoe is defined by the mount it fits.
Four measurements define a shoe: pad length and width, pad thickness, stem height, and the bolt hole pattern. Suppliers who publish a size table are publishing the range they build to, not a standard that crosses brands.
Shopping by part number therefore works only inside one brand’s catalogue, and a shoe described as heavy duty tells you nothing about whether it will hold the edge at the right height on your mouldboard. Once the four measurements are on paper, the shoe can be quoted by any manufacturer that builds to a drawing. Where the mounting follows a published pattern, the AASHTO and DIN bolt patterns are the references most public fleets name in specifications.
| Measurement | How to take it | Why it decides fit |
|---|---|---|
| Pad length and width | Steel tape across the flat face of the pad | Sets the contact area carrying the blade’s weight |
| Pad thickness | Calipers or a rule on the unworn end of the pad | The starting material available before the wear limit |
| Stem or bracket height | From the pad face to the mounting face | Determines the adjustment range and the achievable edge height |
| Hole spacing and diameter | Centre-to-centre between holes, then hole diameter | The measurement that prevents a wrong bolt pattern |
| Mounting offset | Distance from the blade end or bracket edge to the first hole | Controls how the shoe sits under the edge |
Bolt-on versus weld-on replacement
The mounting style decides how the shoe comes off, and in practice it decides when the job happens. Bolt-on shoes are removed with hand tools and reinstalled on the original bracket; weld-on shoes replace the mounting plate itself and require hot work on the blade structure.
Choose bolt-on replacement when the bracket is sound and the holes still hold a fastener at the correct height: it is faster, needs no hot work, and keeps blades interchangeable across the fleet. Choose weld-on replacement when the mount is cracked, missing, or has oval holes that no longer locate the shoe, because bolting a new shoe to a worn mount reproduces the fault.
Weld-on work carries two risks worth planning for. Heat alters the properties of the parent metal locally, which matters on hardened or abrasion-resistant blades, and the base plate can distort as it cools. Both are manageable with the right sequence and controlled cooling, but they are the reason welding procedure belongs in the specification rather than in the improvisation.
How to measure a plowshoe before you order
Measure the shoe in place if the mount is intact, and on the bench if it has already come off. Work through the four defining dimensions in order and write each one down with its unit, then photograph the shoe in position so the bracket style and mounting side are visible. Photographs resolve the ambiguity that measurements alone cannot, particularly where a stem is offset or a bracket wraps the blade end.
- Pad length and width. Measure the flat wear face, not the bracket.
- Pad thickness. Measure at the unworn end so the number reflects new material rather than the current worn state.
- Stem or bracket height. Measure from the pad face to the mounting face, at the current adjuster position, and note the adjustment range.
- Hole pattern. Record centre-to-centre spacing in both directions and the hole diameter, then check whether the holes are still round.
- Mounting offset. Record the distance from the blade end to the first hole, which sets how far outboard the load sits.
If the existing hardware is seized, cut the fasteners rather than the bracket. The same discipline applies to measuring the blade itself if the whole edge is being replaced, and the method in SENTHAI’s guide to measuring a snow plow blade for replacement uses the same principle: define the interface before you order the part.
Step-by-step removal and replacement
Replacement is straightforward as long as the blade is supported and the new shoe is verified before anything comes apart. Park on level ground, support the blade so it cannot drop, and shut the machine down before reaching underneath. Confirm the new shoe matches your recorded measurements and mounting side.
- Support the blade safely and remove the load from the shoe so the fasteners are not under tension.
- Remove the old shoe. Cut seized fasteners rather than forcing nuts, because a sheared stud in a bracket costs more time than a new bolt.
- Inspect the mount. Look for cracks, distortion and elongated holes, and replace the bracket or move to a weld-on shoe if the mount has lost its shape.
- Clean the mating faces so the new shoe sits flat and the adjuster moves freely.
- Fit the new shoe with new fasteners of the correct grade, tightening to the manufacturer’s torque figure rather than by feel.
- Set the initial height using the recorded setting as the starting point, then test on the worst surface in the route.
- Re-check the torque after the first working shift, because new hardware settles under load.
Hardware completeness is what separates a planned replacement from a repeat visit to the shop. The turnkey approach described in SENTHAI’s guide to complete snow plow shoe replacement kits treats the fastener system, the sealing of the package and the traceability of the components as part of the replacement, which is the difference between a fitted shoe and a fitted shoe that stays fitted.
Setting height after installation
A new shoe set to the old number is a starting point and nothing more, because pad thickness and stem height rarely match exactly. Set both sides to the same measured gap, then confirm on the surface rather than on the adjuster. A clean scrape with no gouge marks and no chatter is correct; marks on the pavement or a shudder mean the edge sits lower than the surface allows, and a uniform film of snow that traffic turns to ice means the shoes are too high.
Surface type should drive the setting, not habit. Asphalt and concrete want the edge just clear of joints and patches. Gravel and unpaved lanes want float, with the shoes higher so the blade rides over the surface instead of cutting into it. Hard-packed ice is the case where a lower setting earns its keep, because residue refreezes into a hazard. Operator training material, including the resources distributed through the National Local Technical Assistance Program Association, treats this as a per-route skill rather than a one-time adjustment, and state maintenance programmes such as MnDOT maintenance guidance publish the same logic for agency fleets.
When is a plowshoe finished?
When the wear face is gone and the fastener starts taking the load.
A shoe is at its limit when the remaining pad thickness no longer holds the edge clear of the surface, when the bolt head or nut has become the contact point, or when the mount has deformed around it.
Wear limits are easier to apply as conditions than as a remaining-thickness number, because the consequence of failure is what matters. A shoe worn thin is tolerable on gravel; the same shoe on a paved route will mark the surface and then damage the mount. That judgement depends on measurement, and documented fitment tolerances such as the plus or minus 0.02 mm dimensional tolerance SENTHAI holds on snow plow components are only meaningful because the same discipline is applied at inspection.
| Condition | What it indicates | Action |
|---|---|---|
| Wear face approaching the fastener head | Pad has reached its service limit | Replace both shoes before the next storm cycle |
| Bolt head or nut polished and scoring the surface | The shoe is no longer holding the edge clear | Replace immediately and reset height |
| Holes in the bracket elongated | Loose hardware or repeated impact loading | Replace the mount or move to weld-on shoes |
| Pad cracked through the stem | Impact damage rather than wear | Replace and inspect the blade end for distortion |
| Both pads worn evenly to the same depth | Normal service wear, setup is sound | Replace on schedule and record the setting |
Measurement is the part fleets skip and the part that makes wear limits actionable. Recording pad thickness with calipers at each service produces a wear rate you can plan against, whereas a visual check produces an opinion. Traceable inspection records let a fleet compare batches and pad materials on its own routes instead of trusting a general claim.
Which plowshoe fits my blade?
The one whose measurements match the mount, not the one whose description matches the plow.
Blade width and machine weight decide how much shoe you need; the mounting dimensions decide whether it fits at all. Fitment is measured, capacity is specified.
Start with capacity. A wide blade concentrates load at the outer ends where the shoes sit, and a heavy machine transfers more weight through the same pad area, so both push toward a larger pad and a stronger stem. A light machine pushing a narrow blade performs better with a smaller pad and a low-friction face, because drag costs more than pad life there. Then confirm fitment against the four measurements you recorded, and treat any mismatch in hole spacing as a stop rather than something to be drilled out on the bench.
Quotation practice matters more than catalogue range here. A supplier working from a model name alone is guessing between variants of the same blade, while one working from a drawing or a measurement sheet can confirm the interface before production runs. Quoting starts from the mount on your machine.
Spares planning for a winter fleet
Spares planning for shoes is a stocking decision, and the right answer differs between a two-truck contractor and a municipal fleet with thirty routes. What both have in common is that replacement is predictable: pads wear at a measurable rate on a known route, so the question is when to hold stock rather than whether. Where an agency wants to compare its own wear rates with published practice, the pooled state department of transportation work collected by Clear Roads and the operator-facing guidance from associations such as SIMA are the usual starting points.
- Hold one spare set per blade at minimum, so a mid-storm failure becomes a shop job rather than a cancelled route.
- Standardise the mount across the fleet where possible, because two shoe types cover four trucks more cheaply than four unique types.
- Keep fastener sets with the shoes. Incomplete hardware is a documented cause of premature shoe loss and lost shop time.
- Record wearing rates by route so reordering follows consumption instead of calendar habit.
- Confirm lead time before the season, because the weeks before the first storm are the worst moment to discover a part is made to order.
The closing point is the one that saves the most money: a plowshoe is defined by its mount, so buy it the way any other interface part is bought, by measurement and drawing. Fleets that capture those four measurements once can replace shoes from any qualified manufacturer without the annual scramble, which is the practical version of the argument in SENTHAI’s explainer on why plow shoes matter in snow removal. The Federal Highway Administration road weather programme frames the wider context: snow and ice treatment decisions sit on top of equipment that is set up correctly in the first place.
FAQ
Can I replace only the worn shoe, or should I replace both?
Replace both, or at least record the difference. A new shoe on one side and a worn one on the other puts the blade out of level and loads the new pad harder than the old one, so it wears quickly and the machine still gouges on the short side. If budget forces a single replacement, measure the remaining pad thickness on the other side and reset both adjusters so the edge ends up level.
Do plowshoes have to come from the plow manufacturer?
No, provided the mounting matches. Bolt-on shoes are defined by pad dimensions, stem height, hole spacing and hole diameter, so a shoe built to those measurements fits the blade regardless of the badge on the moldboard. The trade-off is documentation: an OEM shoe arrives with a part number that matches a drawing, while an aftermarket shoe needs the measurements verified before production.
How much shop time does a plowshoe replacement take?
On a bolt-on mount with clean hardware, plan on a short job for both sides: raise and safely support the blade, remove the fasteners, fit the new shoes, set the height and re-check the torque. The variable is seized or damaged hardware. Weld-on replacement is a different job because it involves cutting the old plate, preparing the surface, welding and allowing the joint to cool before the blade goes back into service.
What should I send a supplier to get the right replacement shoe?
Send the plow make and model, the mounting style, a photo of the existing shoe in place, and the four measurements: pad length and width, pad thickness, stem height, and the centre-to-centre distance between bolt holes with the hole diameter. Add the surface types the machine runs on. That combination lets a manufacturer confirm fitment against a drawing before the parts are produced.
Send SENTHAI a measurement sheet or a photo of your existing plowshoe and the mounting bracket. Fitment is confirmed against AASHTO and DIN bolt patterns and held to a dimensional tolerance of plus or minus 0.02 mm, with lot-level traceability on production batches. Write to [email protected] for a replacement quotation or a fitment check.
Related articles
 Best Snow Plow Blade Family for Your Fleet: Top 5 ScenariosKnowledge
 Top 10 Snow Plow Blade Types for Winter Fleets (Ranked by Duty Fit)Knowledge
 Top 5 Best Carbide Blade Configurations for Highway PlowingKnowledge
 Best Snow Plow Blade Materials Ranked: Steel vs Carbide vs Cladding vs Rubber-CarbideKnowledge